Setting Up a Successful Backyard Berry Patch

A neighbor notices a patch of empty, weed-choked dirt in your backyard and asks if you're planning a garden, only for you to realize you haven't actually bought any seeds yet. It's a common scenario around here. This post explains how to pick, plant, and maintain berry bushes that actually thrive in Northern Ontario's climate. We'll look at soil preparation, choosing the right varieties for our zone, and how to keep the local wildlife from eating your harvest before you do.
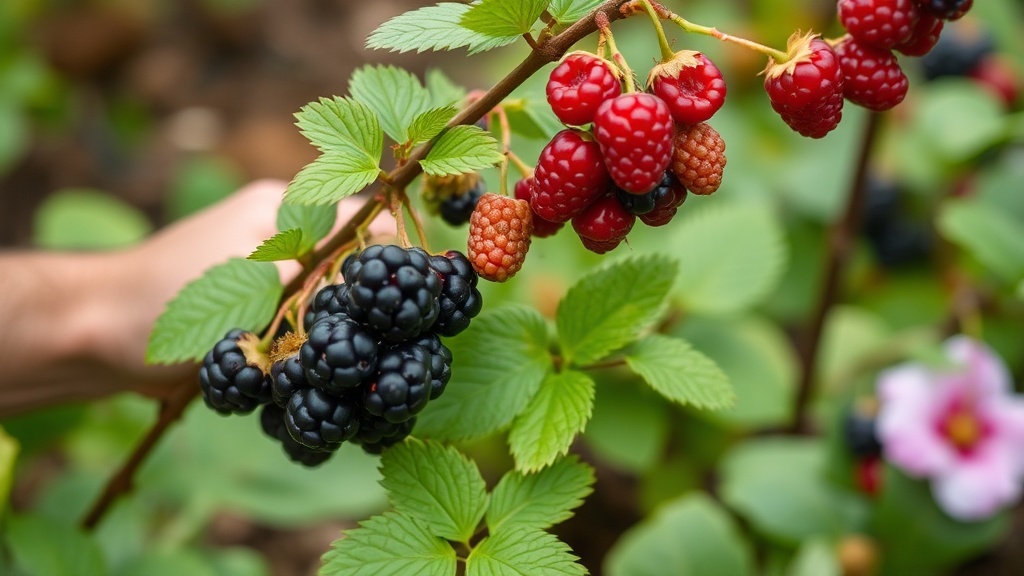
Which Berries Grow Best in Northern Ontario?
The best berries for our region are hardy varieties like raspberries, blueberries, and strawberries that can handle our heavy clay soils and cold winters. In Dryden, we deal with much different conditions than the southern parts of the province. We have shorter growing seasons and much more intense frost cycles. You can't just plant a delicate berry from a big-box store and expect it to survive a January freeze.
Blueberries are a fantastic choice if your soil is acidic. Most of our local soil tends to be a bit acidic anyway, which is a huge plus. If your soil is more neutral, you might want to look into strawberries or even certain types of currants.
When picking your plants, look for "hardy" labels. This isn't just marketing fluff—it's a survival requirement here. If you want to research specific plant hardiness zones, the Wikipedia page on plant hardiness is a great place to start checking the compatibility of your backyard with certain species.
- Raspberries: These are incredibly reliable. You can get red, black, or even golden varieties.
- Strawberries: Great for small spaces or even hanging baskets, though the bugs love them.
- Blueberries: These require acidic soil (pH of 4.5 to 5.5) to really thrive.
- Saskatoons: These are almost indestructible in our climate. They taste like a cross between a blueberry and an almond.
How Much Does it Cost to Start a Berry Patch?
Starting a berry patch typically costs between $50 and $200 depending on how many plants you buy and whether you need to amend your soil significantly. A single high-quality berry bush from a nursery usually runs between $15 and $35. If you're starting small with just a few strawberry runners, you'll spend much less.
Don't forget to budget for the "hidden" costs. You'll need organic compost, a good mulch like cedar chips, and perhaps some organic fertilizer. It's much cheaper to buy these in bulk at a local hardware store than to buy tiny bags at a garden center every time you run out.
Here is a rough breakdown of what you might spend for a modest 10x10 foot patch:
| Item | Estimated Cost (CAD) | Notes |
|---|---|---|
| Berry Plants (6-8 units) | $120 - $180 | Based on nursery prices for bushes. |
| Organic Compost/Soil | $40 - $60 | Essential for improving drainage. |
| Mulch (Cedar or Straw) | $20 - $30 | Helps keep moisture in. |
| Basic Tools | $0 - $50 | Assuming you have a shovel/trowel. |
If you're on a tight budget, check out local community groups. Sometimes people are even giving away divisions of their plants for free. It's a great way to get started without a huge upfront investment.
How Do I Prepare the Soil for Berries?
You must improve your soil drainage and acidity before planting any berries to ensure they don't rot during our wet spring melts. Most berries hate "wet feet"—that's gardener speak for roots sitting in a puddle of water. If your backyard is a bit swampy, you'll need to build up a mound or a raised bed.
First, get a soil test. You can often get these through local agricultural extensions or even some home and garden supply stores. You need to know if you're dealing with heavy clay or sandy loam. If you have clay (which is very common in the Dryden area), you'll want to mix in plenty of organic matter.
Organic matter does two things: it breaks up the heavy clay so roots can breathe, and it adds nutrients. I personally love using composted manure or well-rotted leaves. It's cheap, effective, and your berries will thank you.
Once the soil is ready, add a layer of mulch. This is a non-negotiable step. Mulch keeps the roots cool during our hot July days and prevents weeds from stealing the nutrients you just paid for. Straw is the traditional choice for strawberries, but wood chips work wonders for bushes like blueberries or raspberries.
Before you get too deep into the dirt, make sure you aren't inviting too many uninvited guests. Once your berries start ripening, the local wildlife will notice. It's a good idea to look into preparing your backyard for local wildlife sightings so you aren't surprised when a deer or a bear decides your berry patch is a buffet.
What is the Best Time to Plant?
The best time to plant berries in Northern Ontario is in the early spring once the soil is workable, or in the early fall before the first hard frost. Spring planting is generally safer because it gives the plant the entire summer to establish a root system before the winter hits.
If you plant in the fall, you have to be careful. You want the plant to be established enough to handle the freeze, but you don't want it growing too much new foliage right before the snow flies. If you're a beginner, stick to spring. It's much more forgiving.
Wait until the danger of a hard frost has passed. In our part of Ontario, that's usually a bit later than people think. If you plant too early and a late frost hits, you might kill your new investment.
A quick tip: watch the weather. If the forecast is calling for a sudden heatwave right after you plant, wait a week. You want a period of consistent, mild weather to help those roots settle in.
Common Mistakes to Avoid
One of the biggest mistakes I see is overwatering. It's easy to think that more water equals more berries, but too much water leads to root rot and mold. Check the soil with your finger; if it's still damp an inch down, you don't need to water.
Another mistake is neglecting the "pruning" part of the job. Yes, it sounds like work, but if you don't prune your raspberries or blueberries, they'll become a tangled, unproductive mess. It's a bit of a chore, but it's worth it for the harvest.
Also, don't forget about the sun. Most berries need at least six to eight hours of direct sunlight to produce sweet fruit. If you plant them in the shade of a large maple tree, you'll end up with a lot of green, tasteless berries.
Lastly, watch your spacing. It's tempting to cram as many plants as possible into a small area to get more fruit, but plants need air circulation. If they're too crowded, you'll deal with more diseases and pests. Give them room to breathe.
If you're looking for a treat once your berries are finally ripe, you might find yourself heading out to grab some local snacks elsewhere. While you wait for your own harvest, you can check out where to grab a quick bite in Dryden to keep your energy up while you're gardening.
Growing your own food is a different kind of satisfaction. There's something about picking a handful of berries that you grew from a tiny bush in your own backyard. It's much more rewarding than buying a plastic carton from the grocery store. Just remember to be patient—the first year is usually about survival, and the second year is when the real magic happens.
Steps
- 1
Test Your Soil pH
- 2
Select Climate-Hardy Varieties
- 3
Prepare the Planting Bed
- 4
Establish a Watering Routine